• Fan Page

Gaming and Motivation Lesson Plan

game

I am creating a lesson plan using game based strategies.  Also incorporated in this plan will be some motivational strategies used to engage the coaches.  There are many important components when creating a game based lesson plan that I will touch upon:

  • Pacing
  • Instructions
  • Controls
  • Knowledge
  • Achievements
  • Story
  • Endgame
  • Assessment
  • Timing
  • Fun and Motivation

To give a brief explanation of my Capstone project game, I would like to create a game for my coaches to teach them how to spot new skills.  The gaming platform would be similar to the Kinect.

 Pacing

The game will begin by randomly choosing a coach to start by spotting the first skill.  The pace of the game will progress one skill at a time as each coach successfully spots the skill.  The coach will not advance until they successfully spot the skill.  They have unlimited chances until the first coach wins.

 Instructions

The coaches will learn how to play the game by watching a brief lesson on how to spot the skill being played.  The skill will be named, performed, and then spotted by the virtual coach.

Controls

In the game the coach will be controlling the student.  They will need to make sure to have the correct hand and arm placement, as well as the correct stance to keep their balance while spotting the student.

 Knowledge

This game could be played by anyone by is intended for coaches wanting to learn how to spot new skills.  When the coaches begin this game, they should at least have a good idea what each skill is by name.  I do not expect the coaches to know what every skill is and how to correctly spot each skill.  By the time they are finished reaching “Head Coach” status, they should know what each skill is by name, sight, and know how to correctly spot and teach each skill.

 Achievements

There are a few different achievements that can be achieved in this game.  There are different skills that fall into categories that the coach will have to go through.  There is a beginner level that can be achieved once the coach correctly spots all five-beginner skills.  Next is the Novice level that has 7 skills to pass.  The next level is Intermediate.  In the intermediate level there are 10 skills to pass.  Finally there is the Advanced level that can be achieved and 15 skills in this level.

The coaches will be able to practice spotting the skill three times and given pointers until they have to spot the skill for scoring.

Story

Tumbling Extreme’s Head Coach Destinee sprung her ankle during class and needs a replacement Head Coach.  The coaches will compete for this spot in the game by successfully completing 4 levels and learning to spot 37 new skills.

 Endgame

The ending to the game is a new Head Coach will be found and Tumbling Extreme will continue to prosper in the virtual gymnastics world.  The evil character that the coaches will be fighting against during the game is the student.  In gymnastics, students are unpredictable.  They may chicken out or their body may give out and the coach needs to make sure to account for this.

Assessment

The built-in assessments of this game are the coach will have to progressively go through the game.  They are not able to move on to the next level until they have successfully completed each skill in order for each level.  This will ensure that the coach is progressing at a level that allows them to build up their coaching skills in a progression needed to move to the next skill.

 Timing

There is some time that would need to put in for this game to be completed successfully.  Not all skills will be able to be mastered on the first try.  As stated above, the coach has three tries to spot the skill before they are scored. To speed up the game, the coach can bypass the practice spots and just score the spot right away.  This would allow the coach to speed up the game if they wished.

 Fun and Motivation

This game would be fun for the right crowd because they are learning to spot new skills and saving Tumbling Extreme.  This game is interactive and engaging.  It provides a challenge to the coach to master each skill.  Employees enjoy recognition and fun.  I would use this game as motivation by crowning a Head Coach every week and displaying the winner in the gym.  This would give the winner bragging rights but will also encourage friendly competition to learn all of the skills.  Coaches that have become Head Coach in the game are allowed to become a certified coach once they correctly spot the skill in a real life setting.

Capstone Update and Reflection

It seems like it has been a while since I have made a blog post on here.  The progress I have made on my project has more so been changes that I have made to my project.  I unfortunately did not pass the first class to this course because of technical issues.  I have had to adapt and make a few changes.


I am making training videos for my employees to learn how to spot new skills.  The videos will be located on my Tumbling Extreme webpage.  This will allow access for my employees and will also have the link to the Classmarker.com page where the exam part of training will take place.

I have not achieved any goals because an action plan was not created due to the technical problems I had.  I do believe that I am on a good path.  I have my plan in place.  I have spoken with a friend who will do the filming for me.  I will then put the videos together.  I will start off with 4 videos.  The skills will be:

  • back roll
  • cartwheel
  • handstand roll
  • back handspring.

I will be making my first video over the weekend for the assignment that will be turned in on Monday.  One thing that I have had on my mind since taking this course is how to help my 4-year-old read.  He could not start VPK this year because he missed the birthday cut off by a month.  This means he will be an old kindergartener.  I want to use these points and see if I can get him to learn the words using photos and words.  I will try and convert these words into his short-term memory.

The most important piece of information that I will use is the usage of text or pictures and images.  It is important for me to be careful and think about which will be best for my audience.  I think by following the pointers that I have learned in this class will help my training videos be a success.

PE iMovie_1

 I am really enjoying learning how to use the tool iMovie.  I have always wondered if they had a tool like this in order to create short videos.  I have only trained on sessions 1-4 so far but I have pretty much learned the basics before I actually start creating my own videos. Below is a screenshot of the iMovie homepage once it is open.

 One of the first things I had to do was update my version of iMovie to the latest version.  I was able to do this through the iMac App Store.  After that was completed the training showed the user how to upload videos and images from a tape, digital camera, or a memory-based camera.  This seems to be very easy especially since I have a camera with a firewire3.  iMovie also allows the user to ad live action feeds to the project being worked on.

 Next iMovie showed how to select portions of clips to be added to the project being worked on.  The user can simply highlight the portion of the clip that they wish to use and then drag it to the project area.

 One of the best tips that I got out of the training was to make sure that the advanced tool box was check so that the tool bar is available to use at all times.  This is the easiest way to be able to start rating the clips.

Depending on which color the clip is highlighted lets the user know what status each clip is in:

  • Green: Indicates the clip is rated as good footage and can be rated by clicking the green star
  • Orange: Indicates that a portion of the clip has been used in a project.
  • Red: Indicates the footage is not good and can be deleted or disregarded and can be rated by clicking the clear start.
  • Blue: Indicates that the footage has been tagged with keywords.
  • Purple: Indicates that there are faces detected in the footage.  It is not always accurate but it is a great way to find footage with people.

Below is an example of the color bars on clips.

 Next I will move on to sections 5 and 6 and begin learning how to edit projects.

BP7 RILS ClassMarker

Implementing my RILS plan has not gone as smoothly as planned due to technology.  My project will be used for training the employees at the gymnastics club that I am opening.

I began my project wanting to use the tool ZohoChallenge for my training.  I created a free account and began creating a training quiz that I would like to use for my new trainees.  As I tried to invite the employees to take the quiz, I learned that I had to upgrade my account to $6/mo.  For what I was getting I thought this was a good price but I did have to wait to upgrade due to a lost debit card.

Once my new debit card arrived in the mail last Friday I tried upgrading my account and the option to upgrade had been removed.  I called technical support only to find out that the website was getting shutdown in December.  I began looking around and found a new site that would allow me to send quizzes to the employees under the free account.

I created my exam on Sunday once I found the new tool ClassMarker.com.  I sent the exam to the two current employees and received responses back today.

I really liked this tool for a few reasons:

  • Easy to create quizzes
  • Easy to invite quiz takers
  • Easy to see the results and make necessary changes
  • Free

When one of the quiz takers took the exam it said he only got a 50% and was trying to figure out why.  I went into the results and noticed that the short answers had to be typed out exactly as I had typed which made it hard to use the short answer question type.  I was able to go back in and change his points and he did score a 100%.

This is definitely a tool that I will use for training employees that need to learn the basic information about the club.

BP 6 ZohoChallenge

I created a free account and then created my first quiz on ZohoChallenge.  It was very easy to set up.  Now I did not realize that I was not able to invite those of my choice with this free account.  The only way for me to use this training quiz that I have created is to upgrade to the next account for $6 a month.

I definitely will be using this as a training tool for the employees at the gymnastics club.  I can create tests based on subjects.  Answers can be:

  • multiple choice
  • true/false
  • short-answer
  • fill in the blank.

The first quiz that I created was a short training quiz with questions related to costs for registering and costs of classes.  There are only 8 questions but they are the most frequent questions that are asked in regards to costs.

Below is a screen shot of the 8 fill in the blank questions.  I have not assigned this quiz yet.  I will be sending the invites out to the employees on Tuesday when I am able to upgrade the account.


BP5 RILS ZohoChallenge

The application that I will use for this blog post is the ZohoChallenge tool.  This tool allows the user to create quizzes based on what ever content they choose and invite users to complete the quizzes.  There are limitations to which the user can invite test-takers based on the type of account the user has.

The free account only allows your quiz to be taken by the public.  The user is also only able to allow 100 participants under this account.  The rest of the accounts are listed below:

  • Basic $6                     Invitees/mo 300
  • Standard $12            Invitees/mo 500
  • Premium $25           Invitees/mo 1000
  • Premium Plus $45  Invitees/m0 1500

The only type of support they offer are a sales telephone line and an email address for support.  The great news is the site is very easy to use.  The quizzes are easy to create and they make it very easy to create the setting that the main user wishes to have for each individual quiz.

I am going to upgrade my account to the $6 account on Tuesday.  This will allow me to use this tool as a training module for the current employees.

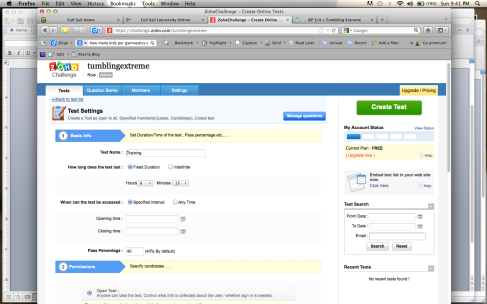
Below is a screenshot of what the dashboard looks like.  The page that it is on allows me to create the time limit and the dates when the quiz can be accessed. It is a really neat tool to use.

Image

BP 3/4

Click Here Amanda’s post discussing the Edmodo tool was very interesting.  I like the thought that educators can share ideas and files. This is very convenient. Another great advantage of this site is there is no cost and it is easy to register.

I even suggested using this for families.  Each member could have their own username and password.  They would each add their own comments, events, and appointments and they would be shown on the shared calendar.  A great way to keep your family organized! Or is this too much?

Click Here Wesley introduced a great tool to us!  It is called Pixlr and it can be compared to Photoshop.  One of the great advantages is the cost difference.  Pixlr is free.  Wesley even mentioned he would be using it to edit wedding photos.  He provided a before and after shot that looks amazing.  Another great point that he made was you do not have to download anything to your computer because it is ran through a website.
I had suggested, since he has so much experience, he make some YouTube series teaching how to use the Pixlr tool and which Photoshop tool is compares too.  I will definitely use this tool and see how it compares to Photoshop.  I have been using Photoshop to create logos for my businesses so I would like to see which program is easier to use.

BP1_PLE Personal Dash Board

I began confused and unsure what to do with my personal dashboard.  It took my 1:1 meeting with my instructor in order to actually understand.  This was exactly what I needed to get more organized.  As I continue throughout the term I will continue adding to my dashboard to make sure everything I need is handy.

The first thing I did was decide what I wanted to have on my home page.  Three important things came to mind:

  • Email
  • Calendar
  • To Do list

This page is important and I do not want it to be too cluttered.  I will add widgets as needed.

Next I began on my Full Sail tab.  I wanted to keep my school stuff separate so that I can have it all in one place all on its own.  I added the Wimba link, the connect site and my Full Sail email link.  These are the most used sites that I use at Full Sail and it is so nice to finally have them all in one place.

BP2_Prezi @ My Factory

The emerging technology tool that I used was Prezi.  I had never used or heard of this tool and was interested once I went to the website.  I began to look through a bunch of them and thought how colorful and eye catching they were.  I realized this was the perfect platform to layout my business.

I began by exploring the website to see what they had to offer.  They had three different main memberships.  The first one was the Public membership, which was free and gave the consumer the core features and 100 MB of storage.  The second membership was the Enjoy and costs $4.94 per month and comes with a 30 day free trial.  Included in this membership were the core features, 500 MB of storage, the ability to make it private, ability to use a custom logo, and premium customer support.  Finally was the Pro membership, which was $13.25 per month and the 30-day free trial as well.  This membership came with the same as Enjoy except this one includes 2 GB of storage and Prezi desktop, which allows offline editing.  They also had an educational membership and group membership and I chose the educational membership, which was free and gave the same rights as the Enjoy membership.

Once I logged on I looked up the different options for customer support in case I needed assistance.  They did offer a variety of ways to get help:

  • Premium Support: available for paying customers and answers as quickly as 1 business day.
  • Forum Support: other Prezi users can offer assistance to one another.
  • Prezi Experts:  Experts on Prezi are available to answer questions.
  • Manual:  A manual is provided as an instructional booklet to refer to if a consumer does not wish to use any other means of support.
  • FAQ’s: A list of frequently asked questions is also provided for users to refer to for help.

Once I looked over the cost and support, I began to create my first Prezi (shown above).  I chose that background because the concept of @ My Factory is kind of a big idea.  I want My Factory to be a one-stop shop for services that people need and use.  We want to give back to the community.  In my Prezi, I was able to show a few of the branches that will be offered @ My Factory.  We will continue to add services as we grow.  It was very easy to navigate and use their features to create my Prezi.  The only problem I had was trying to figure out how to get back to the Prezi account page once I have created my Prezi.

By using the student account, I was able to see the different privacy features that Prezi has to offer.  They have three different options and the first one I found very interesting:

  • Public and Allow Copy:  this allows everyone to see my Prezi and allows him or her to copy and use my content.  If anyone can give me an example of when they would share a Prezi that would be great!
  • Public: this allows everyone to see my Prezi and does not allow them to copy or use my content.
  • Private: this is only offered to paying customers and those with an educational account.  This allows the user to all the Prezi to only be viewed by them or select whom they wish to share it with.

Some of the cool features that Prezi offers is importing media such as PowerPoint slides, images, videos or pdf files.  It also has an iPad app that allows the user to edit and share the Prezi from anywhere with Wi-Fi.  The Prezi can be presented either online or downloaded and saved to share offline.  The coolest feature I saw was it allows the user to share the link to have a real-time meeting so anyone invited can view it.

I enjoyed creating my Prezi because it was very easy to do.  It is easy to share and create new Prezi’s.  I would like to continue building off of this Prezi and create a page for each branch of the business.  It would be easy to keep followers up to date on what is going on with each branch.

References:

www.prezi.com

CS1 ADDIE Training Model to be used at Tumbling Extreme

I enjoyed reading about the ADDIE process this week and I believe this will be very useful for me as I continue my journey.  I do enjoy training but never realized all that went in to it.  It seemed very simple self-explanatory but many people make the mistake of skipping the first step.  According to Intulogy, which is a company that trains based off of this model says the three steps:

  • Define the business goals that are trying to be achieved.
  • Define the material that should be taught.
  • Find the learner’s current capabilities.

Many companies make the mistake of jumping right into the training and either confuse or bore the learner’s because they have not defined the correct material that needs to be taught.  One of my pet peeves is training.  I have been moved into a new position in the past and the company did not have a good training process in place.  I was confused and never sure if I was doing the right thing the entire time I was employed there.

This model is definitely something that I want to use moving forward in my business adventures.  I would like to have my gymnastics club Tumbling Extreme up and running by January and plan on using this model to train my employees.  I will need to define what my business goals are that I want to achieve.  I want all of my employees to be on the same page as me.  I want them to know how to stretch, spot, run a class, and correct students the same way that I do.  I want them to know the proper procedures for handling problem students.  Next, I would need to define all of the material that I want to be taught.  I would need to find the skills that are the most important and widely used.  Finally, I will need to analyze the employee’s current skills to see who will need more focus on what area.

I have been a little stressed out about opening my club, but knowing that I have a training model to follow makes me feel much better about that aspect.

References:

Michellemartin.typepad.com/ADDIE.pdf

www.newlink.com/~dondark/history_isd/addie.html

www.intulogy.com/addie/